Editorial: I have just came back to this blog after a long period of absence due to some major life events (moving out of Australia) and I found this post still a draft, from approximately August 2011; since I did spend the time writing it, I might as well post it. So here it is folks, the first post since I'm back is a post from the past.
I've just come back from France where I celebrated my birthday a few weeks ago.
Amongst my presents was a Western Digital 2.5" Scorpio Blue 1TB hard drive and a G.Skill DDR3 SO-DIMM 8GB (2x4GB) kit for my MacBook Pro. (yeah I'm a nerd :P)
So of course I had to document the entire procedure and take pictures of everything !
The upgrade was not all that smooth (I blame Apple, see next post) but I've got it all (almost) working.
Now of course doing these kind of modifications to your computer yourself will certainly void your warranty, may cause irreversible damage to your computer etc... do it at your own risk !
OK, Let's start by taking this baby apart shall we ?
All we need is a small philips screwdriver and a small torn screwdriver (for the hard drive) as seen on the next picture:
Don't forget to use your anti-static strap if you have one, otherwise don't forget to touch some metal part of your computer to discharge yourself of any static you may be carrying.
Failure to do so may result in damage to your computer, especially to the RAM which is very sensitive to static. I attached my anti-static strap to some metal par at the back of my desktop computer case.
Next, lie the MBP upside down (face with the Apple logo down) on some soft surface (to avoid scratching it !) and unscrew the 10 screws holding the back plate (7 shorts, 3 longs).
To remember where each went I placed them in the order I took them out, see the following pic:
Once the screws are off, the plate should come off easily; put it aside.
I'll start by upgrading the HDD.
I've read some comments on the internet about how the new 1TB HDD are too big for the MBP (12.5mm), and it won't fit. I have to say it is true that it's quite big compared to the original one (see pic):
However it fits perfectly, and I have had no trouble at all installing it.
So start by un-tightening the two screws holding the HDD bracket in place:
Then remove and store that bracket with its two screws somewhere safe.
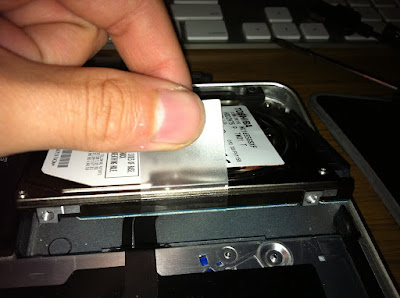
Next, pull the transparent tape slowly to get the HDD out:
You will need to remove the connector that goes to the logic board:
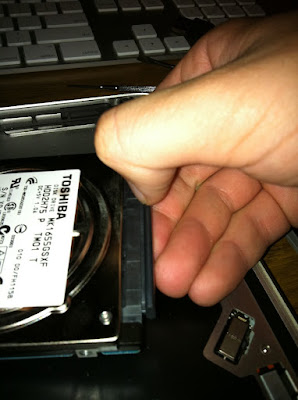
To do that, just insert your nail (or something of the sort), in between the connector and the HDD, and pull slightly away from the HDD until the connector becomes loose:
There are 4 (four) mounting screws around the HDD, and if your new HDD did not come with some attached (mine did not) you will have to transfer them across. This is where you need your torx screwdriver, the position of the 4 screws are circled in red in the following picture:
Screw them back onto your new HDD and you're ready to continue:
Now store that old HDD somewhere safe; in my case I will use it later to restore my mac during the install of OS X.
Put the logic board connector on the new HDD, and place it down.
Replace the HDD mounting bracket:
And you're done for the HDD !


Aucun commentaire:
Enregistrer un commentaire