mercredi 3 septembre 2014

How to solve conflicts between different version of assemblies when deploying to Windows Azure Mobile Service

It's quite a long title but it says it all. When deploying to Windows Mobile Azure Service, the hosting environment has some pre-defined assemblies version that it likes to keep.

So if you've happily updated your nuget packages and all of the sudden your Azure Mobile Service site stops and in the logs you see:

Exception=System.IO.FileLoadException: Could not load file or assembly 'System.Web.Http, Version=5.2.2.0 etc....

Or

Found conflicts between different versions of the same dependent assembly 'System.Web.Http': 5.1.0.0, 5.2.2.0. Please change your project to use version '5.1.0.0' which is the one currently supported by the hosting environment.

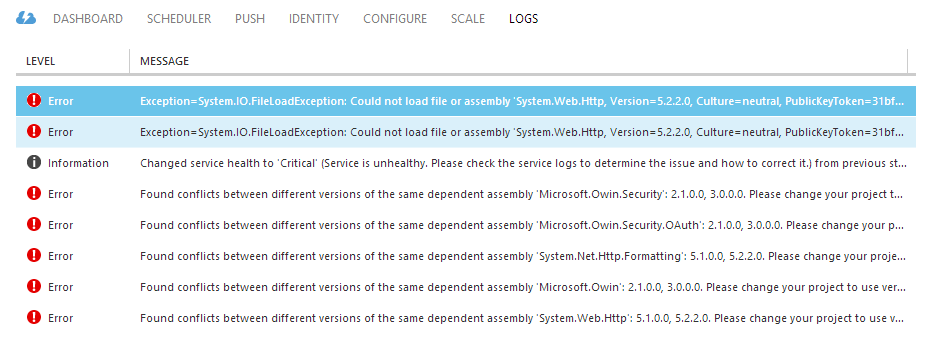
The kind of fun messages you'd get if you dare update those nuget packages


To solve that, we'll need to downgrade the nuget packages, which is no small feat. Obviously removing and re-adding the packages manually is out of the question; and we need a permanent solution to the package updating issue too.

Turns out NuGet 2.8 can help us with that. Here's an extract from the packages.config of the original (before the update) project.


The trick is to add a version constraint like so allowedVersions="[5.1.2]". It's all described on NuGet's documentation. Applying those constraints links to something like this:


Then it's just a matter of running Update-Package -reinstall to restore the packages to their right version... well not quite, for me it re-installed all the other packages in the projects in the solution, took a long time and spat a completely bogus solution that did not compile. The (much) longer approach is to update them one by doing something like:

Get-Project -All | ?{ $_ | Get-Package | ?{ $_.Id -eq 'Microsoft.AspNet.WebApi.Core' } } | %{ $_ | Update-Package Microsoft.AspNet.WebApi.Core -Reinstall }


Which is very tedious. Till next time, happy coding.

vendredi 24 janvier 2014

Windows Store C# Application: Reading a network stream

Here's a little snippet that will allow a Windows Store C# application send a command string to a server and then get a reply:

private async Task<string> DoCommand(string command)
{
    StringBuilder strBuilder = new StringBuilder();
    using (StreamSocket clientSocket = new StreamSocket())
    {
        await clientSocket.ConnectAsync(_serverHost, _serverPort);
        using (DataWriter writer = new DataWriter(clientSocket.OutputStream))
        {
            writer.WriteString(command);
            await writer.StoreAsync();
            writer.DetachStream();
        }
        using (DataReader reader = new DataReader(clientSocket.InputStream))
        {
            reader.InputStreamOptions = InputStreamOptions.Partial;
            await reader.LoadAsync(8192);
            while (reader.UnconsumedBufferLength > 0)
            {
                strBuilder.Append(reader.ReadString(reader.UnconsumedBufferLength));
                await reader.LoadAsync(8192);
            }
            reader.DetachStream();
        }
    }
    return (strBuilder.ToString());
}

What's important is the loop that will get the data until the end of the stream. This example is for a server that will reply some data and then close the connection; it's not suitable for an endless stream of data. I use this particular example to connect to CGMiner's api, where I send it a command string and it replies with some data, then close the connection.

mardi 14 janvier 2014

Windows Store & WCF Frustration

I was doing a nice & simple news app for the Windows Store in C# that uses WCF as its backend, and everything was going fine (by the book).

I created the Windows Store project, added Service Reference and started to code away happily. But at some point I decided to indicate in my WCF contract that my service can throw FaultExceptions.

It was already throwing FaultExceptions in some methods as part of its "normal" operation, and it was working fine (the Windows Store app was getting the FaultExceptions with all the metadata I attached) but I wanted to make it explicit for the other developers who were using my service to see which method threw FaultExceptions and which did not.

That was a very bad mistake that took an entire evening with the team to figure out: do not use FaultContract in your WCF service if your client is a Windows Store app. It will simply fail to generate the client proxy the next time you do an update service reference. That is the worst kind of error, because there could be some time between the moment you've added the FaultContract and the moment you  wonder where on Earth is your proxy client. And it does not even put out a message, warning or error when you update the service reference: it includes all the classes except the client proxy. A silent but deadly error.
And that lead us to a bug hunt where we re-created the Web.configs, created test projects trying to reproduce the bug, reverted files etc...

mercredi 7 août 2013

Nitro::Terrain Frustum Culling

I have progressed a bit on my terrain, I have brought back full dynamic lighting and frustum culling !
The lighting equations were from Shader X7 originally, and they model the Cook-Torrance lighting model which suits all my shading needs.

I had some concerns regarding the blending of different terrain materials (I'm doing a simple slope based material splatting), especially regarding the normals. I read this blog post about blending normals, and it got me thinking about how I should blend the normals of the different terrain materials.
I decided to test out some normal blending functions but none of them gave the expected results... the only thing that worked was when I added the two normals together !
float3 BlendNormals(float3 n1, float3 n2, float factor)
{
    return (normalize(float3(lerp(n1.xy, n2.xy, factor), n1.z*n2.z)));
}
I settled on something like the whiteout blend, except I needed to select how much of which normal to choose so I added the lerp; I'm not sure how that affects the accuracy of the result but it gives a decent enough normal for lighting.

Finally frustum culling makes a big comeback, I hadn't touched it since the last version of the terrain that used my home-cooked-ready-to-blow math functions. Well I say that but hey, it worked, so it wasn't broken and I shouldn't have touched it. My fault. But now that I've converted to XNA::Math let's keep rolling with it.
Turns out I was getting weird culling with just ComputeFrustumFromProjection (XNA::Math built-in), and true enough it was getting me a View Space frustum, so I had to convert it to a World Space frustum (transform it by the inverse of the view matrix). That's it, now frustum culling works !

That's an important step for the algorithms I plan on adding soon, which will require the terrain to be rendered multiple times from different perspectives (yes, shadow maps !).
Below you can find the code that computes the correct World frustum using XNA::Math (credit to this guy):

void CDLODTerrain::Prepare(Camera const &camera)
{
    _curtSelection = CDLODQuadTreeTerrain::LODSelection();
    XMFLOAT3 camPos;
    XMStoreFloat3(&camPos, camera.Position());
    XNA::Frustum frustum;
    XNA::Frustum worldFrustum;
    XMMATRIX projMat = camera.ProjectionMatrix();
    ComputeFrustumFromProjection(&frustum, &projMat);
    XMVECTOR scale, rotation, translation, detView;

    // The frustum is in view space, so we need to get the inverse view matrix
    // to transform it to world space.
    XMMATRIX invView = XMMatrixInverse(&detView, camera.ViewMatrix());

    // Decompose the inverse view matrix and transform the frustum with the components.
    XMMatrixDecompose(&scale, &rotation, &translation, invView);
    TransformFrustum(&worldFrustum, &frustum, XMVectorGetX(scale), rotation, translation);

    _curtViewingRange = camera.FarClip();
    _quadTree.LODSelect(camPos, worldFrustum, _curtViewingRange, _curtSelection);
}

The code is not optimized at all but it's correct and that's all that matters.
And below a video of the result:


mardi 6 août 2013

Continuous Level Of Detail terrain

I have recently re-started to work on my terrain engine from 2 years ago. This time it's DX11 only, and I've managed to finally get the geometry just right.

The problems:
I had been battling with the vertices for so long, not exactly sure what was causing all the artifacts I was having: stripes, background appearing in front of foreground objects, vertex being culled for (apparent) no reason and finally holes in the geometry (patch).

The first one (the stripes) and second one were due to not setting depth writes (duh, I was tired), I finally caught that after plowing through dozens of rasterizer states. My objects (terrain tiles) were actually sorted from front to back so the bug was somewhat hard to track.

It was certainly not helped by the wrong vertex winding order (I should have read the doc more carefully): I always wind my vertices in counter-clockwise fashion (maybe an old OpenGL habit). But in DirectX 11 it's not the default, so I turned "counter clockwise is front" to true in the rasterizer.

That was not the end of the road, as the code to draw the terrain patches was very old and back then I was very much debuting my programming career; so not so many comments, lots of "magic" values and a questionable sense of object orientation. Which means now that my patches were drawing I had one triangle missing in each quad. Turns out I had a similar problem on an OpenGL game I developed for Epitech recently (the R-Type) and it had to do with the index size.

Short version is: check that the number of vertices you store in those vertex buffers are < 65536 if you are going to use DXGI_FORMAT_R16_UINT, and don't hard code that enum, but make it dynamic so that if you have less than those vertices you can enjoy a smaller buffer, while when you go over that you switch seamlessly to R32_UINT.

The implementation:
I chose MJP's framework to rebase my algorithm, so that I have a solid base to start off. The algorithm is based on Philip Strugar's paper on CDLOD terrain and I've adapted a few things to make it simpler to implement (at least for me), as I was trying to get it working before trying to optimize it.

So what's the result ? Here's a video showing what I have so far:


Next I'll be working on the shading of the terrain, and making it larger. I'm deciding between two routes for the texturing technique: one massive texture (think 16kx16k +) that is broken down in mip-maps that are paged in when required (a la Rage but not quite) or a procedural texture splatting technique which is a classic in this domain.
Personally, the procedural texture is going to be easier to implement at first, and it would be a nice complement to a procedural terrain. Then I should be able to add a mega texture on top for all those unique features an artist would want to put in.

jeudi 27 juin 2013

Skyrim & ATI Radeon GPU

This is an odd post in the hopes it might help someone.

I have spent the last year or so trying to get some of my games to work on my new Windows 8 gaming rig and I recently managed to get Skyrim going again.

The issue was that in the Skyrim installation folder (under Steam that is C:\Program Files (x86)\Steam\steamapps\common\skyrim) there was 2 DLLs: atimgpud.dll and atiumdag.dll.

I'm not sure how that got here, I usually don't mess with my installation folders but I've had this game for a long time and whenever I get a new system I just copy the whole steamapps folder.

So I just erased the two files and that fixed the "Failed to initialize renderer: Unknown error" that I was having.

Now on to slaying some dragons.

mercredi 11 juillet 2012

Upgrading mid-2009 MacBook Pro 13"

Editorial: I have just came back to this blog after a long period of absence due to some major life events (moving out of Australia) and I found this post still a draft, from approximately August 2011; since I did spend the time writing it, I might as well post it. So here it is folks, the first post since I'm back is a post from the past.

I've just come back from France where I celebrated my birthday a few weeks ago.
Amongst my presents was a Western Digital 2.5" Scorpio Blue 1TB hard drive and a G.Skill DDR3 SO-DIMM 8GB (2x4GB) kit for my MacBook Pro. (yeah I'm a nerd :P)
So of course I had to document the entire procedure and take pictures of everything !
The upgrade was not all that smooth (I blame Apple, see next post) but I've got it all (almost) working.

Now of course doing these kind of modifications to your computer yourself will certainly void your warranty, may cause irreversible damage to your computer etc... do it at your own risk !

OK, Let's start by taking this baby apart shall we ?
All we need is a small philips screwdriver and a small torn screwdriver (for the hard drive) as seen on the next picture:


Don't forget to use your anti-static strap if you have one, otherwise don't forget to touch some metal part of your computer to discharge yourself of any static you may be carrying.
Failure to do so may result in damage to your computer, especially to the RAM which is very sensitive to static. I attached my anti-static strap to some metal par at the back of my desktop computer case.


Next, lie the MBP upside down (face with the Apple logo down) on some soft surface (to avoid scratching it !) and unscrew the 10 screws holding the back plate (7 shorts, 3 longs).
To remember where each went I placed them in the order I took them out, see the following pic:


Once the screws are off, the plate should come off easily; put it aside.
I'll start by upgrading the HDD.
I've read some comments on the internet about how the new 1TB HDD are too big for the MBP (12.5mm), and it won't fit. I have to say it is true that it's quite big compared to the original one (see pic):


However it fits perfectly, and I have had no trouble at all installing it.
So start by un-tightening the two screws holding the HDD bracket in place:


Then remove and store that bracket with its two screws somewhere safe.
Next, pull the transparent tape slowly to get the HDD out:


You will need to remove the connector that goes to the logic board:
To do that, just insert your nail (or something of the sort), in between the connector and the HDD, and pull slightly away from the HDD until the connector becomes loose:


There are 4 (four) mounting screws around the HDD, and if your new HDD did not come with some attached (mine did not) you will have to transfer them across. This is where you need your torx screwdriver, the position of the 4 screws are circled in red in the following picture:


Screw them back onto your new HDD and you're ready to continue:


Now store that old HDD somewhere safe; in my case I will use it later to restore my mac during the install of OS X.
Put the logic board connector on the new HDD, and place it down.


Replace the HDD mounting bracket:


And you're done for the HDD !